The first plugin
We'll build the Simple Image plugin that will allow us to add images to our articles. You can view the final result of the plugin.
At first, we need to create some files where we will develop and test our new Tool. Create a folder with these three files:
In example.html we will test our plugin, so let's add some markup and connect Editor.js there:
If you open this page in a browser, you'll see an empty Editor with the only internal Paragraph Tool available. Now we a ready to start creating our own plugin.
Ok, let's get started with creating a JavaScript class for our Tool in simple-image.js file.
The render method will create a UI of a Block that will be appended when our Tool will be selected from the Toolbox. The second method, save will extract the Block's data from that UI.
Our UI will be quite simple: just an input in which users will paste an image URL. So let's implement a render method:
Then we need to provide a save method for extracting a Block data from the UI:
On saving, Editor.js will pass Block's content to the save method and we should implement the logic of which data we should save by our Tool. Block content is the Element returned by render with actual state of that.
So in our case, we just need to get input's value and return our Tool's data object:
We will add a «caption» and other fields to our Block later.
Our Block Plugin is almost done. To make that appear at the Toolbox, we should provide an icon and a title with a static getter toolbox.
Our Tool is ready. It's time to connect it with the Editor.
Let's add a tools property to the configuration object at the example.html.
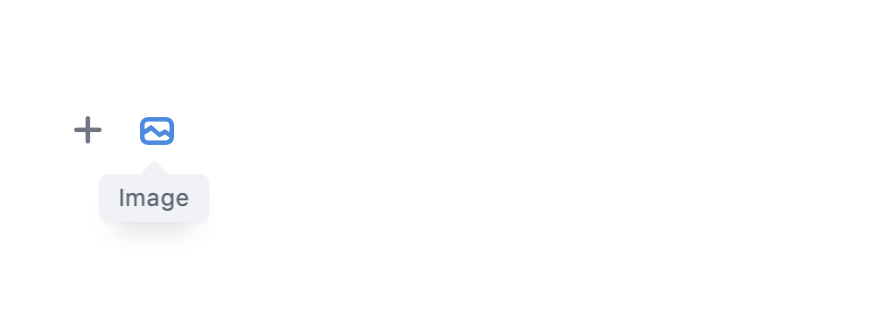
Open example.html in a browser: if everything is fine, you will see a Plus Button of a Toolbox. Press Tab or click on the Plus Button and our Tool will be there.
After you select an Image Tool, the render will be called and returned input will be placed as a new Block. You can add some CSS classes to it and place styles at simple-image.css file.
To the final test, we need to check how saving method works. Add a Save-button and output-zone to the example.html
Now everything is ready. You can add Image Block at Editor, paste image URL and click on the Save button. In output zone you will see saved Editor.js data:
We've created some preparation stuff for our playground, but actually all you need to create a Block Tool plugin is the simplest save and render methods. If you want to put your Tool in Toolbox, static getter toolbox with the icon and the title allows you to do that.
In the next chapter, we'll learn how to show previously saved data of our tool.